Hello everybody. This is the tutorial for blender basics. Today I will be teaching you about the basic 3D shapes.
Clear the Project
First off nothing here is needed. So you can drag select everything or you can click “a” and that will select everything too. Then click “x” and delete.
How to Create 3D Objects
Click “shift a” and this will give you a menu. Right now all you care about is mesh. Go to cube and now you have your first 3D objects. Move this to the side. Now click “shift a” again and do a plane, and move this one also to the side. These are some of the most simpler shapes in blender.
3D Objects with Parameters
Here we are going to learn about basic 3D shapes.
UV Sphere
The more complicated shapes are the UV sphere. Click “shift a” and UV sphere. You will see a window at the bottom here. If you open it up you’ll be given parameters. You only care about the segments and the rings. Segments will add vertical lines and the rings will add horizontal lines. Move this to the side.
ICO Sphere
Now you will create an ico sphere. Select the ico sphere. This will also give you parameters. You only care about subdivisions. If you increase this, you’ll be given more faces to work with. If you decrease it, you’ll be given less faces.
Cylinder
Click “shift a” again and this time a cylinder. You also be given parameters again. The vertices will add more vertical lines. Select this and also move this to the side.
Cone
Click “shift a” and cone. If you move the vertices, you’ll be given more vertical lines.
Torus/Donut
Next up is the torus or also known as a donut. Click “shift a” and add torus in. The major segments will add more vertical lines and the minor segments will add more horizontal lines. Move this one also to the side.
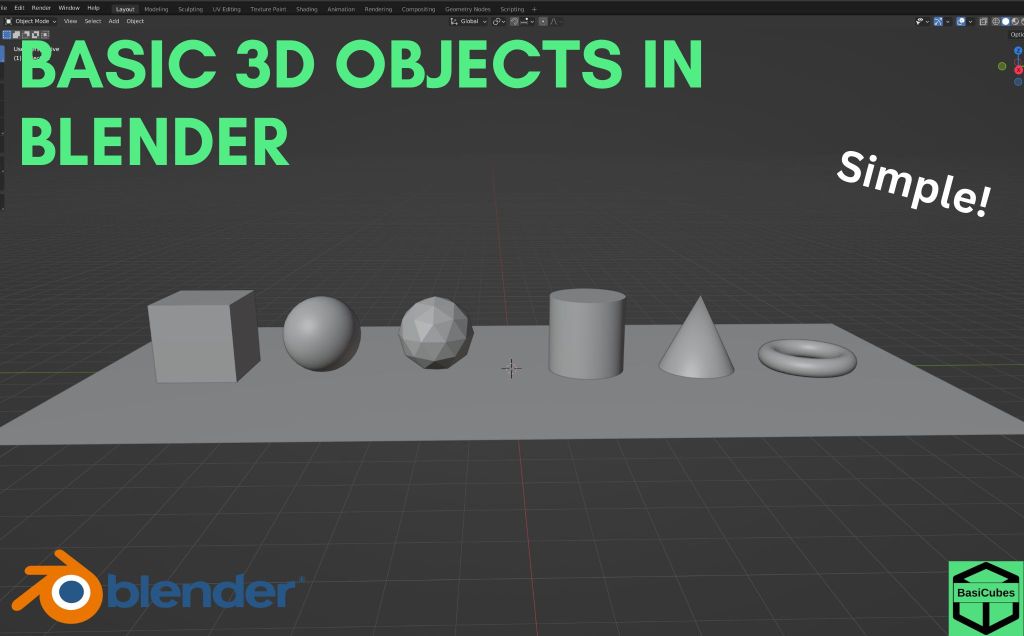
These are all your basic 3D shapes. The cube, the UV sphere, the ico sphere, the cylinder, the cone, and the torus or also donut.
What is Shade Smooth
Some of you may have problems with the UV sphere, the cylinder, the cone ,and the torus. They may have too many faces that are not smooth. To change this, you can right click and click shade auto smooth. This will smoothen everything out. If you look at the icosphere you may be tempted to shade smooth it. However, this produces a bad result as you can see. So to fix this you would create a new icosphere and change the subdivisions up to five. Now if you shade smooth it’ll become way more smooth. W
Simple House Project
What you can now do is combine different 3D objects into one, such as a simple house. Click “shift a” and create a cube. Move this up to ground level. Then after this, create a cone. But this is way too many subdivisions for our house you can change the subdivision down to four. Then click “g”, “z”, and move it up. It should be three. It is not lined up with the cube so we can rotate this by 45 degrees on the z-axis. If you click “s”, “shift z”, there’s the only scale on the x and the y-axis. Soon you will have a really simple house.
Doors and Windows
Let’s say I wanna I would like to add a door. Instead of creating a separate cube again, what I can do is click on the cube that’s already existing and click “shift y”. This will give me a copy. Click zero and this will send it back to the origin point. From here I can scale the cube into a door shape. First I will move it out so I can see the cube. Let’s say four. I can scale across the x-axis. I would change this to 0.075. Then I can scale on the y-axis. We’ll say 0.45. Then I can scale on the z-axis scale and then “z”.
How to Change the Scale Origin
However this is scaling it in a way that will make it hard to reposition the door. What we can do instead is, if you click the period on your keyboard this will give you a bunch of different options. Click 3D cursor. This will now scale it relatively to this 3D cursor here. If you click again, now scale z. This will now scale in a way that would be easier to move, 0.8. What we can do to see if the size is correct is by going up to this gizmos, and clicking this x.
All right and now we can move this door back into the house. You can do this by going up to the y on this gizmos and clicking “g” and “x”. I will move this until it is lined up as we like it. I would like to leave a tiny bit of space. We’ll go minus three. Oh that’s too much, minus 3.05.
Adding the Window
Let’s say I would like to create a window. You can go “shift a” and make a cube. Then I can move it out. Negative four and I can scale it on the y-axis. I would like to change this back to medium point. Click period to get this menu up again and click scale y. And we will go 0.105.
Since this is already a square we do not need to scale on the y-axis. We can go scale and then “shift y” and only scale the Z and the X. You can scale it down until it’s about 0.4. Then we can click on the Y gizmos here and we can move it on the z-axis up to the position that we like it. 1.15. What we can do is go to the x-axis and move it on, “g”, “y”, 3.025. And now we have a simple house
Thank you for watching this video

Leave a comment