
What is Object Mode in Blender
Welcome to Blender Basics, lets do some 3D!
In a 3D scene there are 3 main components: objects, materials, and lights. Artists can create objects and manipulate them independently of other objects. For example, they can affect the geometry, texture, and transformations.
There are 3 modes to affect the geometry of an object in Blender: object mode, edit mode, and sculpt mode. The default mode for modeling is object mode. In this mode, you are able to create, transform, or add modifiers to an object.
How to Create, Destroy, or Join Objects

Basic Operations in Object Mode
Clicking “shift a” will give you a list of meshes, curves, and other objects. Hovering over mesh will give you a second list comprised of primitives. Each have their own specific uses and inputs to tailor the object to your liking.
Clicking “j” will allow you to merge all the selected objects into one. Their origin point will be the same as the object outlined in yellow.
Clicking “x” will delete the objects selected.
WHat are the Simple Objects
The plane is a 2D square with 1 face and no thickness. This is used to create floors and cloths.
The cube is the default 3D object loaded up in a scene. It has 6 faces, 8 vertices, and 12 edges. This is used for making boxes, crates, and dice.
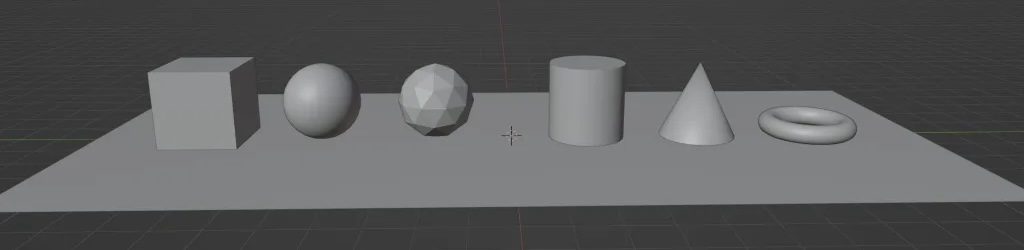
Circle
This is where we get into more complex objects. The circle will create a hollow frame of a polygon. The Vertices will allow you to control the shape, adding or taking away vertices. There are also 3 Fill Types: triangle fan, n-gon, and nothing.Triangle fans will fill the circle with pizza-slice-like faces, n-gon will fill the circle with 1 face, and nothing will keep the circle empty.
UV sphere
The UV Sphere is created from quads, making it great for texturing. There are 2 constraints, each controlling the cuts on the sphere. The segments will control the number of cuts from North to South. The rings will control the cuts from East to West.
Icosphere
The icosphere is a polyhedron made from triangles. The only constraint is subdivisions which controls the divisions on the faces. A value of 1 will give you 20 faces. Every time the value is increased, each face will divide into 4 triangles. Because of this, users must be careful of how many subdivisions are made. Too many can crash Blender.
Cylinder
The cylinder is used to create handles, rods, and pillars. Just like the circle, the vertices will control the shape of the bases.
Depth will control the height of the cylinder and cap fill type will determine whether or not the bases are filled.
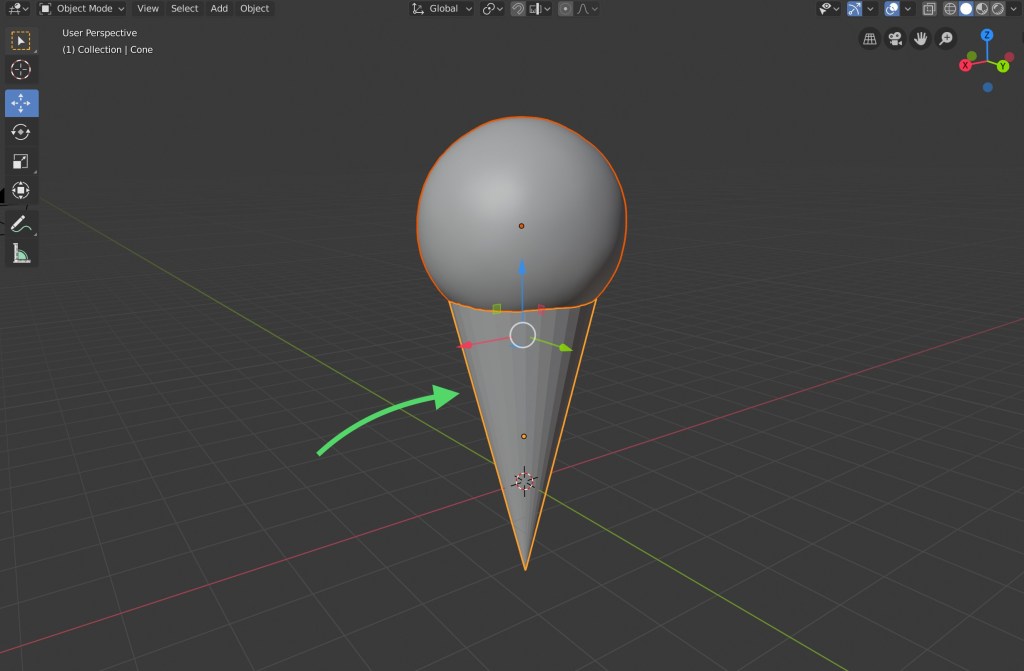
Cone
Objects made from cones are used to make spikes and party hats. Vertices have the same purpose as the cylinder, controlling the shape of the base. Radius 1 sets the radius of the base and radius 2 sets the radius of the tip of the cone. Depth controls the height.
Torus/donut
The torus is more commonly known as the donut. The donut has 4 inputs. The major segments and minor segments control the number of cuts in the donut. Major segments add cuts from the top view and the minor segments add cuts from the side view. Major Radius controls the size of the donut hole and minor radius controls the thickness of the donut.
Grid
The grid is used to create landscape and organic surfaces. Blender will create a plane that comes with a 2 subdivision input. X Subdivisions controls the cuts in the x-axis. Y Subdivisions controls the cuts in the y-axis.
Monkey
This creates a 3D stylized monkey head. Its just a monkey head.
How to Transform Objects in Blender
There are 3 transforms you can do to an object. You can move, rotate, and scale an object.
Pressing “g” will allow you to freely move the selected object. Pressing x, y, or z will lock the object movement to the corresponding axis.
Rotation is used by clicking “r”. When x, y, or z is pressed, the object will lock its rotation on the axis that is corresponds to the letter pressed.
Clicking “s” will allow you to scale the object. Pressing x, y, or z will scale the object solely on the axis it corresponds to.
What are Modifiers in Blender
Modifiers are tools that will change the geometry of the object in a non-destructive way. This means you are changing the mesh, but the edit is not permanent. You can simply delete the modifier to undo the effects.
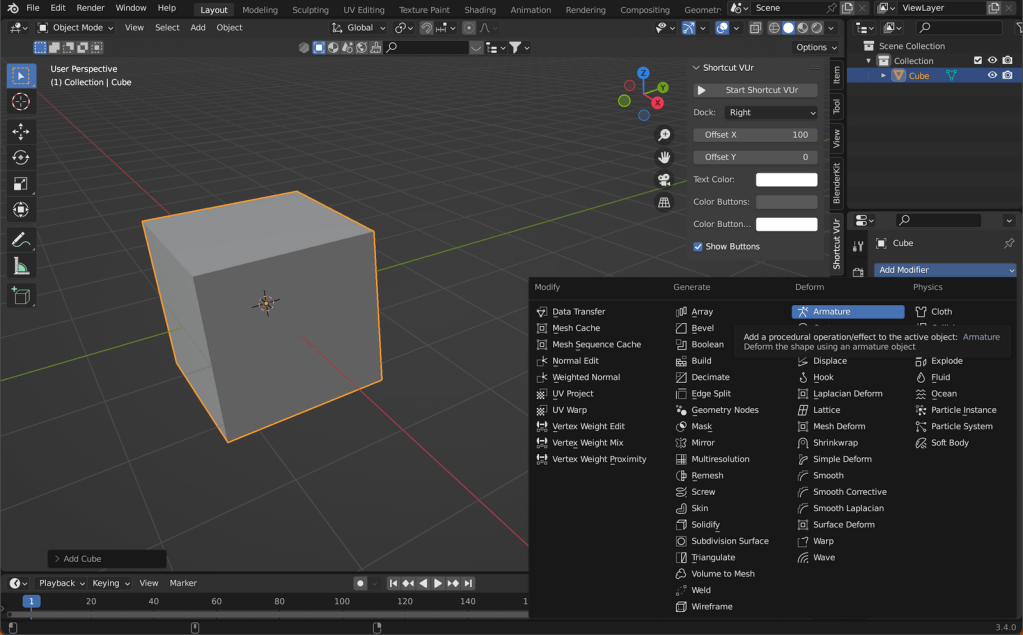
Modifiers fall into 4 categories: generate, deform, or physics category. The generate option will affect the arrangement of the vertices, edges, and faces. The deform will only change the general shape of the object and not affect the vertices, edges, or faces. Physics is the category that runs simulations. Some examples are water, fire, and hair.
Of the 4, the generate category is used the most. Some of the popular modifiers in the generate category are the array, bevel, boolean, mirror, and wireframe.
Array modifier
The array modifier is used to create copies of an object in an array. This is useful for creating large scenes with rows of objects.
You can control the offset of each object with 3 different options. The relative offset will move the copies in the direction of the x, y, and z axis. The distance is controlled by the object’s scale multiplied by the factor. The constant offset will move the duplicated objects with a constant amount on an axis. The object offset will transform the copies relative to a selected object(usually an empty).
Caps will give you 2 object inputs. The cap start and end will take the object input and use it at the beginning or at the end of the array.
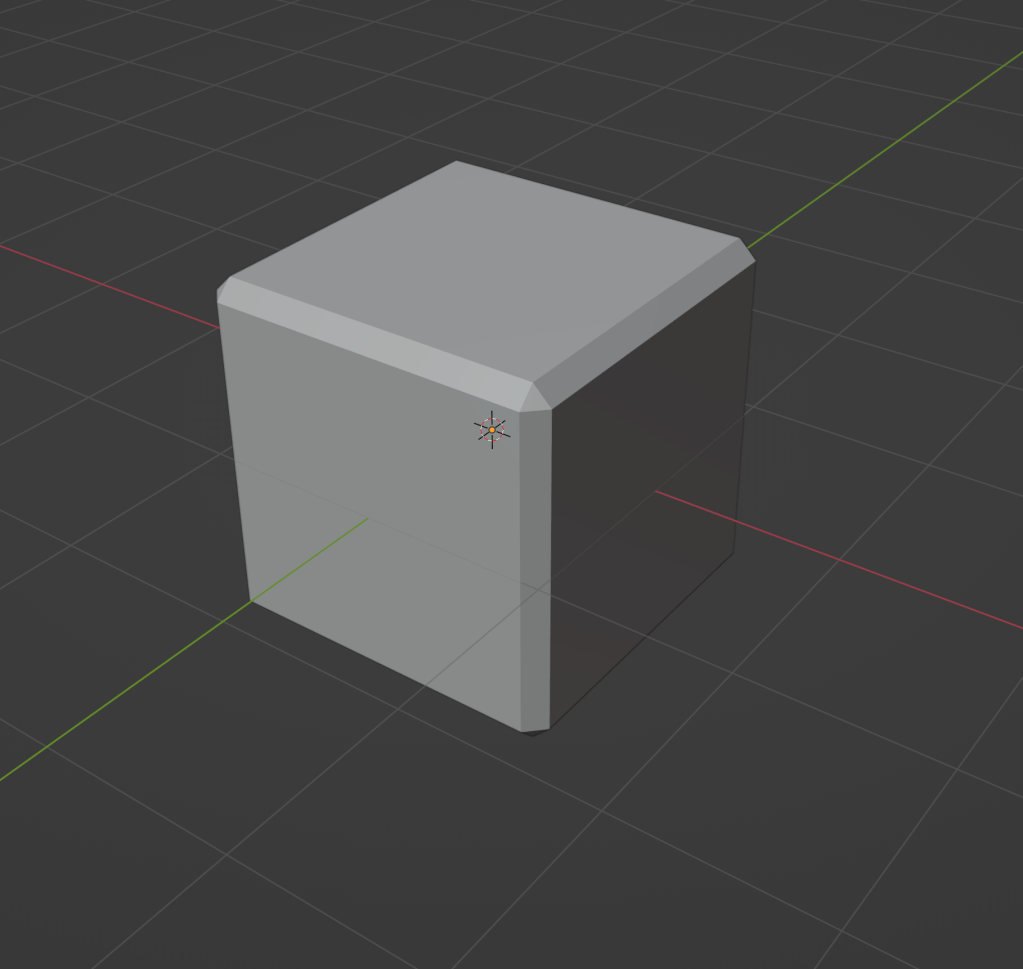
Bevel modifier
The bevel modifier has the same function as the bevel tool in edit mode, but in a non-destructive way. This modifier automatically adds bevels around the edges of a 3D mesh. This is useful in smoothening out the edges.
There are 2 types of bevels available, each smoothening out a different part of the mesh. The vertex bevel will smoothen out the vertex, giving a more round appearance. The edges bevel will smoothen out the edges, making a more soft transition between faces.
The amount controls the influence of the effect. A lower value will have a more subtle influence than a higher value.

Value of 0.1

Value of 0.5
The number of edges or vertices generated is controlled by segments. Increasing the number segments will result in a smoother edge or vertex; however, this will take a hit on the performance.
Value of 1

Value of 3
Boolean modifier
The boolean modifier will remove certain parts of the mesh while using a target object as the template.
The operand type will let you choose the type of target. The target can be a single object or it can be a collection of objects.
There are 3 types of booleans that will each have different cuts. The intersect boolean will remove any part of the mesh outside of the target object. The union boolean will combine the target object to the mesh. Any interior faces(unnecessary faces) will be removed. The difference boolean will remove any parts of the mesh inside.
There are 2 Solver option. Fast will be compute the Boolean faster, but overlapping geometry will stay. This option sacrifices accuracy for time. The other option is exact. This is a much slower, but more accurate. In addition, it will clean up the overlapping geometry.
Wireframe modifier
This modifier is often used in the creation of motion graphics. The wireframe modifier will remove all faces and convert the edges into 4-sided polygons.
The thickness will control the size of the wireframe.
There are 2 types of thickness, even and relative. Even will keep everything the same thickness. Relative will make thickness dependent on the length of the edge. Short edges will be thinner than a longer edges.
Mirror modifier
The mirror modifier is used to create symmetric models. The objects can be reflected across the x, y, and/or z axis.
The axis will control on which axis the object is reflected across.
The bisect option will cut the object’s mesh along the axis selected. However, in order for the bisect to work, the same axis must be selected in the axis control.
The mirror object is the focus point which defines how the object mirror. However, the mirror object is often empty.
Clipping is a crucial input for modeling. When using the mirror modifier in edit mode, clipping will prevent vertices from crossing over the symmetry line. This makes models cleaner and simpler.
Displace modifier
The displace modifier is used to shift parts of the mesh(Note that you will need to subdivide the mesh a bit). This is useful in creating landscape or adding details to materials. The modifier will take a texture or vertex group as the input. It will then translate it into a black and white image and use the those values as displacement. Black will mean no displacement and white will mean displacement.
The vertex group will use a vertex group as the the values for displacement.
The texture option is the more common method to displace the mesh. It will give you a preset list with different textures. These will be different patterns that have values ranging from 0 to 1.
Strength will adjust the amount of displacement. The lower the value, the less the height in the displacement. The higher the value, the more height in the displacement. The height can be determined by the displacement value multiplied by strength.
The midlevel adjusts the height at which the displacement value is automatically 0. In simplified terms, a plane at a certain height is created and anything below the plane no longer has displacement.
Conclusion
There are 3 modes for modeling in Blender. They are object, edit, and sculpting mode. Object is the default mode and has 3 main uses. Users are able to create, transform, and modify objects.

Leave a comment