
hello everyone welcome back to Blender Basics and today I’ll be going over lights in blender.
What are the Types of Lights in Blender
In blender there are four types of lights. There is the point light, the sunlight, the spotlight, and then there is the area light.
WHat is the Point Light
We will start with the point light first. To find the lights in blender, click “shift a” and scroll down to light(make sure you are in light not light probe) and click on point. We can move this up a tiny bit and create a plane. We can scale this by five. As you can see nothing changes, whether we hide the light or we keep the light. This is because we are in solid view. Make sure you go to the top and go to the very last sphere and click on the rendered view.

Now you can see that there is some light. This is used to add some general lighting. To change the properties of the light you will need to go to the right panel here and click on the green light bulb. You will be given a bunch of options. You can change the color and the power(the brightness). You can control the radius which will make the shadows or the fallout of the light smoother.
WHat is the Spot Light
We’ll now go on to the spotlight. You can delete the point light and we can click “shift a” to add in the spotlight. Since this is a little too big we can scale it by 0.2 and move this up a bit. You can see that it creates a spotlight, just like it says in the name. This is used to bring focus or attention to certain objects. You can again change the color, the power, and the size of the circle. To smoothen out the edges, you can change the blend. A higher value will make it smoother along the transition between the center and the non-lit areas. A lower value will make it really sharp.
WHat is the Area Light
Next up we have the area light. You can delete the spotlight and create an area light. Move this up by 1. You can again change the color and the power. The biggest thing about the area light is that you can change the shape of it, right where it says shape. Right now it’s set as a square. You can change it to a rectangle. It will remain as a square, so you must change the values. The disk will make it into a circle and the last one is the ellipse, which is an oval.
WHat is the Sun Light
Finally we have the sunlight. We can delete the area light and add in the Sun. You can move this to the side and we can add in a cube. This will help us to see how the Sun works a little better. The sunlight has a constant intensity in a single direction. You can see that no matter how big this plane is, it will have the same light intensity on it. You can rotate this by clicking “r” and this will change the direction of the shadows. You can change the strength and the color.
World Environment
The world environment in Blender provides indirect lighting. This can be accessed by going to shading, then going to the dropdown menu and changing it to world. Make sure you are in rendered view, the very last sphere. You can change the color and the strength.
What are some Other options for lighting
There are two other options for the color input. The first option is the sky texture. Click “shift a” and type “sky texture”. Then connect the color with the color(the yellow dots).
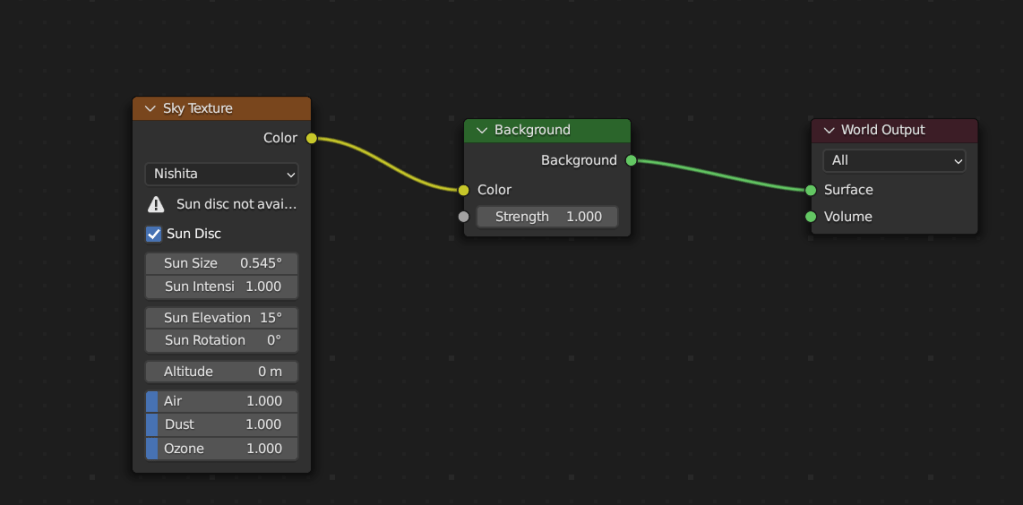
You can change the sun elevation, which is the rotation of the Sun from the horizon. This allows you to show different times of the day. Then you have Sun rotation and this will rotate the sun along the Z axis. There are four more key options left. There is the altitude, air, dust, and ozone inputs. When using these four correctly you can create any Sky texture that is appropriate to your scene.
To most people the sky texture is a bit too much. So most people use HDRIs. The most popular place to get HDRIs is polyhaven. So you can type in polyhaven in your search bar and scroll down to HDRIs. They also offer textures and models, but we are only interested in HDRIs right now. Once you click on a HDRI, you’ll be given a big list of HDRIs. There are many sub-categories here, which will allow you to find HDRIs faster. I’m just going to choose this one right here and click download. This will start to download. It is important to make sure you have save your file where you can find it later. Now we’ll go back to blender and we can get rid of the sky texture. We can add an environment texture and plug the color into color. You will notice that everything becomes pink. This is because there is no texture for the background to use. We can click open, and wherever your file is located, click on it. Mine is right here, and just click open image. Now you have your HDRI in your scene.

Leave a comment