
What is the Compositor in Blender
Welcome to Blender Basics, lets do some 3D!
The compositor in Blender is a powerful node-based compositing tool used to refine and polish your final output. The resulting image will have a more professional and visually appealing look. Because the compositor has the ability to manipulate and combine different elements of a scene, it provides a flexible and intuitive tool for compositing 2D and 3D elements. The Compositor is an essential tool for creating complex visual effects, motion graphics, and composites for film.
Basic Navigation Inside Blender
The middle mouse is used to pan in the compositor. Scrolling on the mouse wheel will zoom in and out.
What are the Key Compositing Nodes in Blender
Compositor nodes in Blender are individual components that represent specific operations in the system. These nodes are connected together to create a network that manipulates and combines different elements of a scene. Blender’s Compositor offers a wide range of node types, making it a versatile and powerful tool for creating complex visual effects and post-processing work.
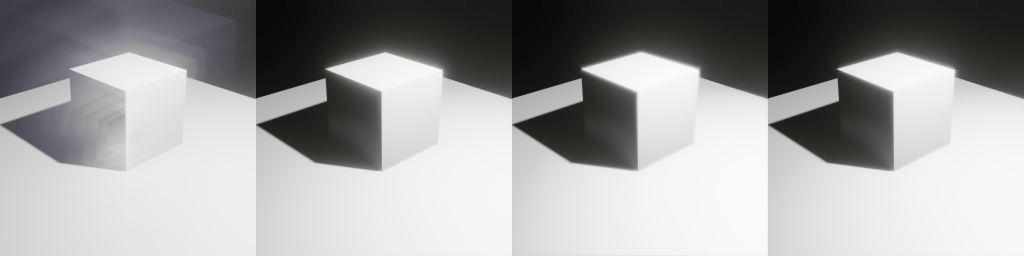
Denoise
The Denoise node is used to denoise renders from Cycles. This helps to significantly reduce render time by producing the same render with fewer samples.
There are 3 prefilter options: None, Fast, and Accurate. None keeps the most details and is the fastest, but it will require a high sample count. Fast will render quickly. In exchange, the image will be slightly blurry. Accurate creates the most detailed render, but takes the longest.
GLARE
The Glare node is used to add lens flares and glows to an image. With the addition of this node, the render will generally become more appealing. However, this node must be used sparingly as to not overexpose the render.
There are four types of glares: Ghost, Streak, Fog glow, and Simple star.
First is ghost. Ghost is used to create a haze over the image. Fog Glow will give a similar look, but is much smaller and has more glow. This option of glare is used more commonly. Streaks is used to simulate lens flares. Finally, simple Star will create a similar look to Streaks, but with stars.
Ghost
Fog Glow
Streaks
Simple Star
Iterations controls the number of times the filter is run through the algorithm. As expected, a higher value will increase the quality and computing time.
Mix will control how much influence the effect has on the image. A negative value will remove the effect, a value of zero will give a 50/50 mix, and a positive value gives returns a solid color.
Threshold is the value that pixels must be brighter than to be affected by the filter.
Hue Correct
Using an Input curve, the Hue Correct Node adjusts the Hue, Saturation, and Value of an image. The curve is set as a straight line by default, but you are able to move the curve around to adjust the hue, saturation, and value. Finally, factor controls the influence the node has on the image.

Color Balance
The Color Balance node will adjust the colors and values of an image. Using the color wheels, you able to add different colors to the lift, gamma, and gain. The factor controls the amount of influence the node has on the on image.

Lift increases the value of dark colors.
Gamma controls the mid tones of the image.
Gain controls the highlights of the render
Contrast & Brightness
The Bright & Contrast node is a color correction node. As in the name, it is used to adjust the brightness and contrast of a render.
Brightness is the factor to increase the overall brightness of the image. Using a negative number will darken an image. Contrast is a scaling factor to make bright pixels brighter and dark pixels darker. The higher the value, the more the details will stand out.
Ellipse/Box Masks
The Ellipse Mask node uses an ellipse as the mask shape, and is used to add a faint blur to the edges of your renders. The Box Mask node uses a square as the mask shape. This node is used to isolate certain objects, making it much easier to work on a specific subject.
The X and Y controls the position of the center of the mask. The positions are fraction of the total width or height, not coordinate points.
A value of 0.5 creates the mask at the center. A value of zero creates the mask on the far left and a value of one creates the mask on the far right.
Width and height control the size and dimensions of the masks as a fraction of the total image.
Rotation will rotate the mask around its center point, making it useful for having slanted masks.
What are Some Key Render Passes
Render passes in Blender refer to the individual components of the final render that can be separated and manipulated in post-processing. By separating these passes, artists can have greater control over the final output, allowing them to adjust the lighting, shading, and other elements to create a more polished and refined image. This flexibility makes Blender a popular choice for creating visual effects and composites for film, TV, and game development.
Z is the distance to any visible surfaces. This is used to add fog or depth to a scene.
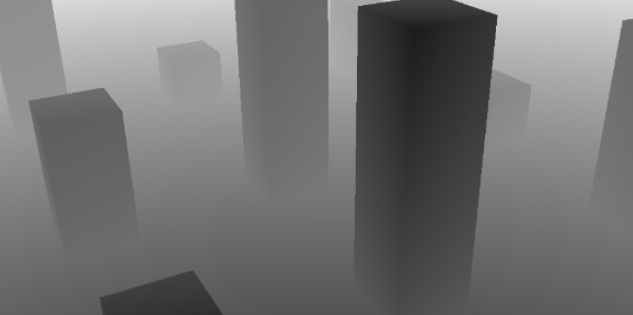
Mist shows the distance to visible surfaces. However, unlike the Z pass, mist is mapped to the 0.0 – 1.0 range. This pass can be used in compositing to fade out objects that are farther away.
There are 2 types of indexes, object and material. The object index creates a mask of the object that can later be used in the Compositor. The material Index creates a mask of the material that can be used in the Compositor
Diffuse will allow the user to control the lighting of a scene. There are three types; direct, indirect, and color. These modifiers come from BSDF node.
Direct lighting will allow the user to control lighting from light sources, emitting surfaces, the background, or ambient occlusion after a single reflection off a surface. Indirect lighting controls the lighting coming from light sources, emitting surfaces, or the background after more than one reflection off a surface. Finally, color controls the color input for BSDF nodes.
Glossy, transmission, and volume will do the same functions as the diffuse pass, but for the glossy, transmission, or volume BSDF.
Environment affects the emission from the directly visible background. This is most commonly used when the film is set to transparent. This render pass can be used to get the environment color and composite it back into the render.
Shadows controls shadows from light objects. This is very useful to composite objects with shadows into existing footage(VFX).
Ambient Occlusion influence the ambient occlusion from directly visible surfaces.
Light Groups are available only in Cycles. It allows the user to change the lighting color and intensity of lights without having to re-render the scene.
Conclusion
In conclusion, the Compositor and Render Passes in Blender are powerful tools that offer a wide range of creative possibilities for your 3D projects. These tools help add polish and a professional look to projects, whether a simple animation or a complex visual effects sequence. With their ease of use, affordability, and flexibility, the Compositor and Render Passes are must-have tools for any 3D artist or animator

Leave a reply to Yul Sung Cancel reply